How to Handle Aligner Attachments, Buttons & Elastics: Patient Survival Guide
A comprehensive patient survival guide to mastering auxiliary clear aligner hardware—composite attachments, precision cutouts, buttons, bite ramps, and orthodontic elastics.
Key Takeaways for Patients & Clinicians:
- Auxiliary Handles: Natural tooth enamel is smooth; composite attachments and precision cutouts provide essential physical handles for 3D rotations, extrusions, and jaw alignment.
- Inside-Out Unhooking Method: Unhook trays from the lingual (tongue) side of posterior molars first, popping both sides loose before peeling forward gently to prevent attachment breakage.
- Elastic Protocol: Change latex/non-latex elastics 3 to 4 times daily (every 4–6 hours). Insert trays into your mouth *first* before hooking elastics onto buttons or cutouts.
- Emergency Rule: If an attachment pops off, do NOT stop wearing your aligner trays. Taking trays out causes rapid relapse and stalls treatment.
When starting clear aligner therapy, many patients expect to wear only smooth, transparent plastic trays. However, to achieve complex tooth movements—such as rotating rounded premolars, extruding stubborn teeth, or realigning an uneven bite—orthodontists rely on essential auxiliary hardware: composite attachments, metal/resin buttons, precision cutouts, bite ramps, and intermaxillary elastic rubber bands.
While these accessories supercharge your treatment velocity and predictability, they can feel awkward, sharp, or confusing during the first few weeks. This comprehensive survival guide breaks down the science behind these auxiliaries, how to manage them daily, and exact steps to handle unexpected mishaps.
1. Demystifying Your Orthodontic Auxiliaries
Clear aligners work primarily by applying pushing forces. Because natural tooth enamel is smooth and slippery, aligners need physical "handles" and anchors to grip teeth effectively.
| Hardware Type | What It Looks & Feels Like | Primary Clinical Function |
|---|---|---|
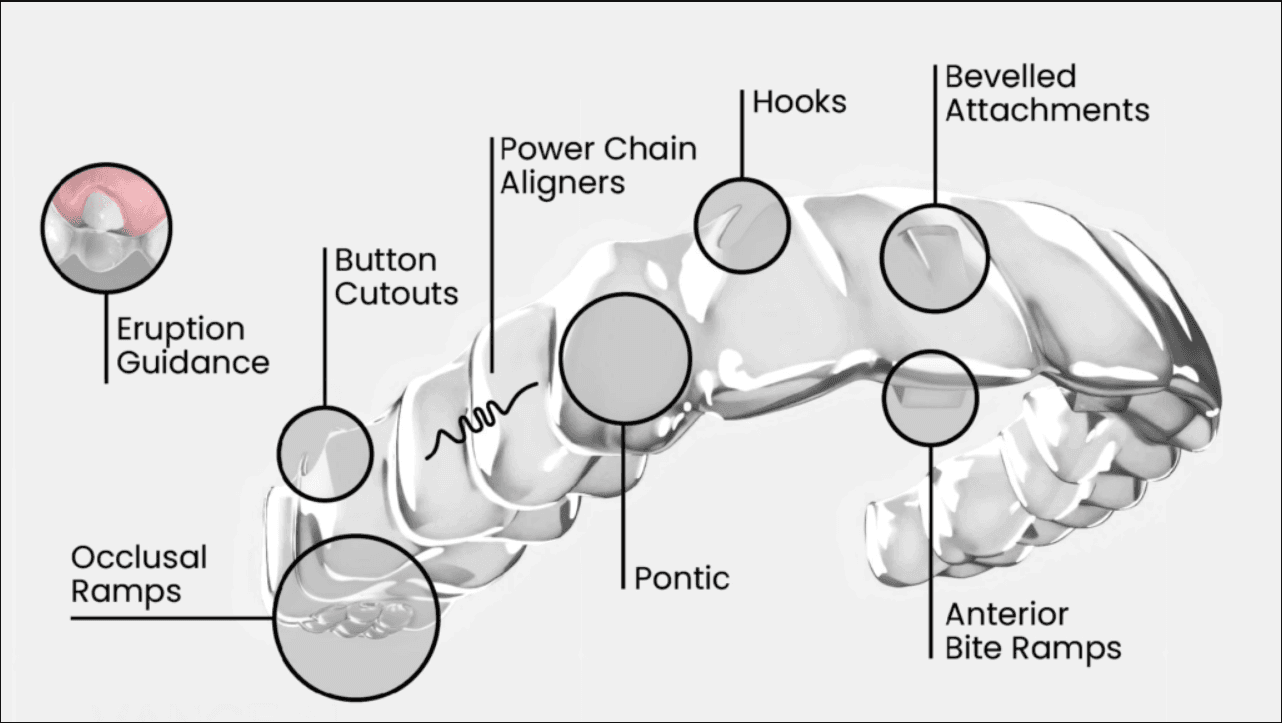
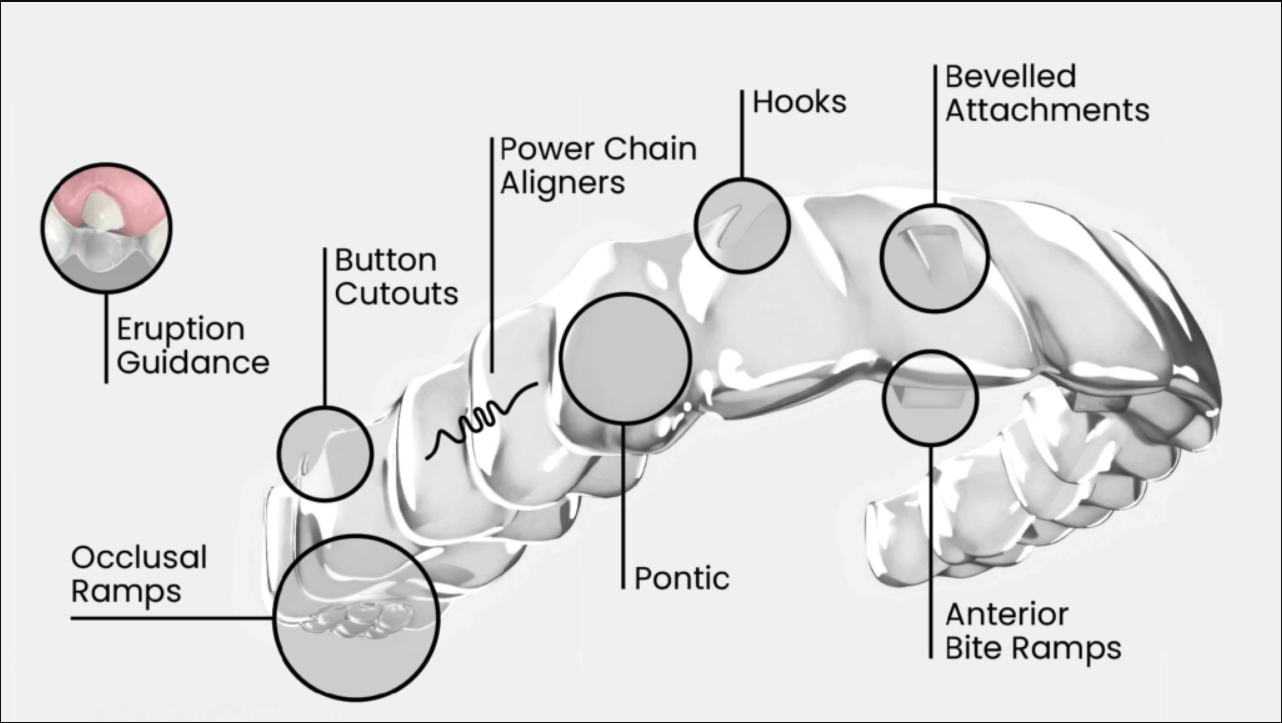
| Composite Attachments | Small, tooth-colored dental resin bumps bonded directly onto specific teeth. | Acts as artificial ledges for aligners to push against, enabling 3D rotations, root torqueing, and extrusions. |
| Bevelled Attachments | Angled composite resin shapes positioned along force planes. | Directs specific rotational or extrusive force vectors without slipping. |
| Precision Cutouts | Engineered crescent slits or notches cut into the edges of aligner trays. | Holds one end of an elastic rubber band directly onto the plastic tray. |
| Orthodontic Buttons | Tiny metal or clear composite hooks bonded near the gumline. | Serves as an anchor point for elastic rubber bands when extra force is needed on specific teeth. |
| Orthodontic Elastics | Small, high-grade medical rubber bands worn between arches. | Applies continuous pulling force between upper and lower jaws to correct overbites, underbites, or crossbites. |
| Anterior & Occlusal Bite Ramps | Built-in plastic ledges on the lingual side of upper front teeth or molars. | Disengages posterior occlusion to accelerate deep bite correction and relieve jaw joint pressure. |
| Eruption Guidance & Pontics | Space bubbles or tooth-colored temporary crowns inside the tray. | Accommodates erupting premolars or masks missing teeth aesthetically during alignment. |
2. Master-Level Daily Removal & Insertion Techniques
When your teeth have multiple attachments, your aligner trays fit significantly tighter. Yanking trays off improperly can cause pain, bend the tray plastic, or pull attachments off your teeth.
### The "Inside-Out" Unhooking Method
1. Start from the Back (Lingual Side): Reach inside your mouth and use your fingertip or thumb to unhook the tray from the tongue side of your back molars.
2. Pop Both Sides Loose: Repeat this step on the opposite back molar until both posterior ends of the tray are dislodged.
3. Peel Forward Gently: Slowly work your fingers forward toward your front teeth, peeling the tray down and away over the composite attachments.
4. Avoid Front Yanking: Never grab the front center of the tray and pull straight up or down; doing so creates sharp leverage that can snap attachments off.
### Utilizing Removal Tools (Aligner Hooks)
If your trays fit tightly over sharp or large attachments, use a specialized plastic removal tool (such as an OrthoKey). Insert the curved hook beneath the rear margin on the tongue side to pop the tray loose safely without straining fingernails or composite bonds.
3. Managing Rubber Bands (Elastics) Like a Pro
Elastic bands provide the continuous intermaxillary tension necessary to move entire dental arches into proper occlusion.
- Change Elastics 3 to 4 Times Daily: Latex and non-latex orthodontic rubber bands lose their elasticity and force retention within 4 to 6 hours. Always put in fresh elastics after every meal.
- Placement Sequence: Insert both upper and lower clear aligner trays into your mouth first. Once the trays are fully seated, use your fingers or an elastic placer hook to latch the rubber bands onto the designated buttons or cutouts.
- Adhere Strictly to Your Prescribed Force: Orthodontic elastics come in specific diameter sizes and force levels (e.g., Light, Medium, Heavy). Never double up on rubber bands in an attempt to speed up your treatment—over-force can cause root damage or unwanted tooth tipping.
4. Emergency Action Protocol: Handling Hardware Failures
| Situation | Immediate Patient Action | What NOT to Do |
|---|---|---|
| An Attachment Pops Off | Keep wearing your aligners as normal! Contact your dental office to notify them. In most cases, they will schedule a quick re-bonding visit or re-evaluate at your next checkup. | Do NOT stop wearing your trays. Taking your aligners out for even a few days allows teeth to relapse rapidly, rendering future trays useless. |
| A Button Detaches | Stop wearing the elastic rubber band on that specific side only. Call your clinic immediately to get the button re-bonded. | Do NOT attempt home repairs. Never glue buttons or attachments back onto teeth using superglue or household adhesives. |
| Rough Edges / Cheek Rubbing | Roll a small pea-sized ball of soft orthodontic wax and press it directly over the sharp button, cutout, or attachment. Use warm salt-water rinses to soothe tissue. | Do NOT cut or file the plastic tray cutouts yourself unless your orthodontist gives explicit instructions on where and how to trim. |
5. Attachment Hygiene & Stain Prevention
Because attachments are crafted from composite dental resin, their textured surface can harbor plaque and absorb dark food dyes if neglected.
- Brush Around Every Bump: Plaque naturally collects along the edges where the attachment meets tooth enamel. Use a soft-bristled electric toothbrush or a narrow interdental brush to sweep around each attachment daily.
- Beware of Staining Foods: Curries (turmeric), dark coffee, red wine, mustard, and dark teas can stain the composite material around attachment borders. Rinse your mouth thoroughly with water after consuming dark beverages before snapping your aligners back in.
- Clean Trays Independently: Always clean your aligners using cool or lukewarm water and non-abrasive liquid soap. Avoid using abrasive toothpastes on your trays, as micro-scratches trap bacteria and make the trays look cloudy over attachments.
Achieve Your Best Smile Outcome
Questions about your clear aligner progress or custom attachment design? Explore expert digital alignment tips and services at [velourcareortho.com](https://www.velourcareortho.com).
Ready to Start Your Digital Orthodontic Case?
Whether you are a dental practitioner seeking 3D OnyxCeph treatment setups or a patient exploring clear aligner options, our clinical orthodontic team is ready to assist.